In our quest to explore what data services Azure offers the mobile developer and how to integrate them with a Xamarin.Forms app, so far we really just touched on familiar database storage. First looking at how to save data to the cloud, then finding out what to do when the data connection went down and we couldn’t talk to the cloud, finally handling conflicts when data being sent from the device doesn’t match what’s already in Azure.
In this post we’re going to look at a different type of data storage – that of storing large amounts of data in Azure. Photos, videos, the novel you’re writing … all from a Xamarin.Forms app. We’re going to find out exactly what Azure Storage is – including what each of the components that compose it do, how to create a storage account, the NuGet packages necessary to integrate it into a Xamarin app (either Classic or Forms), and a drill-down of the API we get to interact with Azure Storage. All of these will be integrated into my favorite app … Cheesed!
What Is Azure Storage?
As you may have surmised, Azure Storage is Microsoft’s cloud computing service dedicated to providing tremendously large amounts of storage space – which can be accessed, of course, over the internet. All access to Azure Storage is done via REST APIs (but don’t worry, we won’t have to do that in our apps). Azure Storage is comprised of several different types of storage options, for the purposes of mobile development, we’re interested in 3:
- Queue storage
- Table storage
- BLOB storage
We’ll tackle Queue and Table storage in-depth in future posts, but as a quick preview, Queue storage is a messaging solution used to facilitate asynchronous communication between applications (aka – a messaging queue). Table storage is composed of key/value pairs and is schema-less … think something along the lines of a NoSQL database.
But the real star of today is…
Azure BLOB Storage
Azure BLOB storage is a means to store any text or binary based data into the cloud. This means anything we can store to the file system on the device, we can store to BLOB storage. It could be a huge amount of data – up to 500 TB! Or it could just be a couple of KB at a time … the point being that BLOB storage gives us the means of storing data that wouldn’t necessarily make sense existing within a database into the cloud.
Organization
In order to understand how to interact with BLOBs from our app, it’s vital that we understand how Azure organizes the BLOBs within itself. There are 3 concepts to understand here:
- Storage Accounts
- BLOB Containers
- BLOBs
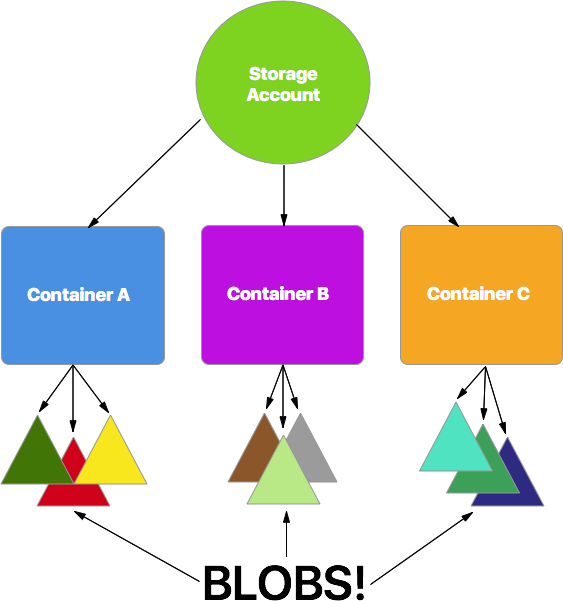 There is one overriding Storage Account for all the entities that we’re going to store within Azure – BLOB, message queue, or table. It’s the account – pretty straight forward.
From there, that account can contain multiple BLOB Containers. There can be any number of containers within a storage account. The purpose of a container is to organize the BLOBs into logical units. Containers also give us a nice way to specify security on BLOBs. So if we have some which we want the general public to have access to, we can put them into container A, where private BLOBs can go into container B.
Finally we get to the BLOBs themselves. There can be any number of BLOBs within a container, all the way up to the 500TB capacity. There are 3 types of BLOBs as well, BLOCK, APPEND and PAGE. Most likely you’ll only use block BLOBs – as they allow read/write access. Append BLOBs only allow appending onto the end of the BLOB (for things like logging). Page BLOBs are used for virtual machine disks – something we’ll never use.
And although you’ll probably never have to do this – I found it pretty amusing that it is possible to send Microsoft a hard disk full of data to populate your BLOBs with, instead of just uploading everything. There’s something funny about the image of a car full of hard disks flying down the highway in order to put all that data up into the cloud.Setup
Let’s now walk through the setup of a storage account within the new Azure portal (portal.azure.com), so we can start storing large files in the cloud!
- The first step obviously is to log in to Azure (easy!)
- Once there, select “new” from the upper left corner, “Data + Storage” from the next blade, “Storage Account” from the blade after that
- From there you can define the parameters for your particular situation, such as the deployment model, the pricing, the geographic of the storage, etc. Click create and a new storage account will be created.

The storage account will be setup after that’s complete. The next step then is to create some containers to hold our BLOBs. The containers can be created through several methods, including programically, but for our purposes we’ll do it manually.
| Open the storage account you just created and then click the “Blob Services” tile in the main dashboard. |

|
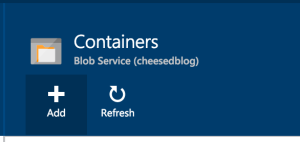
| From there click on the “Containers” dashboard tile. |

|
| A new blade will open which will have an add button which will allow you to create a new container. |
|
You can name the container as you wish, and there are 3 security options we can give the container.- Private – security credentials are required for both read and write operations
- Blob – security credentials are required for write operations, but read operations are open to the public – as long as the specific URL to the BLOB is known
- Container – same as Blob security, but the public can also list off the contents of the container, so as to obtain URLs for the BLOBs
Create the containers in however manner you wish – they can be arranged via security needs or via logical organization – or both.
Security – Shared Access Signatures
On the Settings blade of the Storage Account in the Azure portal, you’ll notice that there are access keys and connection strings listed. These are more or less the keys to the storage kingdom and we want to be sure we take care to guard them, as we’ll need them to create the security credentials to write to the container, and possibly read from it, depending on how we’ve set security.
However, generating the credentials is not as straight forward as it is with Azure Mobile Services, where the key is just passed into the constructor. Instead we need to create something known as a Shared Access Signature (or SAS). This is more robust than just passing an application key in, as we can set specific roles it can perform (such as read only) and also specify when the SAS will expire.
To create the SAS we will need the storage account’s access key – but we cannot generate the SAS on device (nor would it be a good idea to do that even if we could), so the account’s access key will not live on device. Instead, the best method is to create a custom API somewhere and have the app invoke that, retrieve the SAS, and then use that to access the containers and BLOBs.
The demo app that goes along with this post is using Azure Mobile Services, I am creating the SAS in a custom API there. You can create the SAS either with the Node.js backend or .Net backend – there are APIs for both.
Here’s an example of using the Azure Node.js API to generate the SAS:
exports.get = function(request, response) {
    var azure = require('azure');
    var qs = require('querystring');

    // The first 2 parameters are being drawn from the config settings of AMS
    var blobSvc = azure.createBlobService('','','cheesedblog.blob.core.windows.net');

    var startDate = new Date();
    var endDate = new Date(startDate);

    endDate.setMinutes(startDate.getMinutes() + 5);

    var sharedAccessPolicy = {
        AccessPolicy: {
        Permissions: azure.Constants.BlobConstants.SharedAccessPermissions.WRITE,
        Start: startDate,
        Expiry: endDate
    }
    };

    // Blob name is optional here
    var sharedAccessKey = blobSvc.generateSharedAccessSignature(request.query.container.toLowerCase(),'',sharedAccessPolicy);

    var sasQueryString = qs.stringify(sharedAccessKey.queryString);

    response.send(statusCodes.OK, JSON.stringify(sasQueryString));
};
There are a couple of things I want to call out in particular in the code above:
- In the
azure.createBlobService(”,”,’cheesedblog.blob.core.windows.net’);there are 2 empty parameters, these are pulled from Azure Mobile Service’s config settings. If you create one key named AZURE_STORAGE_ACCOUNT and place your storage account’s name into the value; then create another named AZURE_STORAGE_ACCESS_KEY and place your account’s access key into the value – the API will pull those automatically for you. Of course you can pass those in as well if you wish. - When generating the actual shared access signature, we could specify it for a specific BLOB, and the resulting SAS will only be valid for that BLOB – but if we leave that parameter blank, it will be applied for the entire container
- In the example above, when generating the shared access signature, the container we’re targeting is passed in through the query string (
request.query.container). You don’t need to do it this way – I just happen to be.
Of course you don’t need to generate the SAS key this way – you could set it up through a web service hosted elsewhere – but it’s very easy to do using Azure’s Mobile Services, but it’s not tied to it.
Now that we have the storage account setup, a container created, and a means by which to get access to the container … let’s actually create and consume some BLOBs with our Xamarin.Forms app, shall we?
Integrating Azure Storage With Xamarin
First we need to get the correct package installed into the project. Fire up the NuGet package manager and enable the pre-release search feature – then search for “Azure Storage”. A ton of results will be returned – so many that it will be confusing. The package that I have been using is the 6.0.1-preview – although any of the pre-releases after 4.4.0 should work – but as of this writing October 14, 2015 – the package that will work in Xamarin based apps is still in pre-release.

With the package installed, let’s explore the API a bit …
Top Level Objects
As mentioned above, Azure BLOB Storage is organized into 3 layers – the Storage Account, the BLOB Container, then the BLOBs themselves. The API reflects that as well. There are 2 top level objects that exist which represent the Storage Account: CloudStorageAccount and then the overall “BLOB Account” CloudBlobClient . I have not had much use for these classes – you can create everything you need in a hierarchical fashion using them – first new’ing up a CloudStorageAccount then from that getting a CloudBlobClient then from that all of the objects we’re going to talk about below. But the API also gives us a way to skip all of that and just get to the good stuff … so we’re going to do the same and not spend any more time talking about these 2 objects.
Obtaining the SAS
In order to write any BLOB, we are going to need appropriate permissions, and that will come in the form as a Shared Access Signature. The SAS is used to create a StorageCredentials object. This object will be used when creating references to containers and BLOBs – and will specify how long the credentials are good for and which permissions are valid as well. Code to hit the AMS custom API I’m using in the example project and create the StorageCredentials object looks like:
private async Task<StorageCredentials> GetStorageCredentials (bool forPhotos)
{
    // First get the SAS Token from Mobile Services API
    var mobileServiceClient = new MobileServiceClient (AzureConstants.MobileServiceUrl,
                               AzureConstants.MobileServiceAppKey);

    // Invoke the custom API in the mobile services to get the storage SAS token
    var token = await mobileServiceClient
        .InvokeApiAsync<string> (AzureConstants.MobileServiceAPISasName, HttpMethod.Get, null);

    // Create the storage credentials
    return new StorageCredentials (token);
}
BLOB Container
The BLOB container is used to house the individual BLOBs and organize them into logical units and/or by security. All container operations run through the CloudBlobContainer object within Azure-Storage. Depending on how security is setup, we’ll either create this object with just the Uri of the container, or the Uri and StorageCredentials.
Once created we can use this class to get references to the BLOBs themselves. Generally speaking, we’re usually most interested in either creating, updating or reading a Block BLOB (something we can insert, update, read, or delete). To do so we use the GetBlockBlobReference method of the CloudBlobContainer. We could also get Append or Page blobs in much the same way as well – if our application needed to make use of those.
GetBlockBlobReference allows us to specify the name of the BLOB we want to create or access. Which means it is not necessary the BLOB exist in order use this function to get a reference to it.
With the BLOB itself in hand – that’s when things start to get real interesting …
BLOBs!
It’s the BLOB itself where we’re going to store our binary or text data – there are 4 different types of BLOB objects included in the Azure-Storage package. CloudBlob, CloudAppendBlob, CloudPageBlob and CloudBlockBlob with the last 3 inheriting from the first.
We’re just going to talk about CloudBlockBlob‘s here, but the concepts should be applicable to the other classes as well.
To get a reference to the BLOB itself, we can either go through the container object as described above, or use the CloudBlockBlob‘s constructor directly. Using the BLOB’s constructor is no different than the container object – with the exception we need the Uri to the BLOB itself as opposed to the container, and the StorageCredentials need to take in consideration the actual BLOB name and its security.
Working with BLOBs is very similar to any other data entity – we may want to read, write or delete it. Azure-Storage provides an API to do that and also makes accommodations for the fact we may be dealing with HUGE amounts of data.
Uploading / Inserting BLOBs
In order to create a BLOB, we’ll have to get a reference to it through the container’s GetBlockBlobReference. We’ll also have to be sure to pass credentials created from a SAS that allow us to write to the container itself. Once we have the reference to the BLOB – there are 3 APIs we can invoke to upload data to it.
UploadFromByteArrayAsync– Upload a byte arrayUploadFromStreamAsync– Upload a streamUploadTextAsync– Upload a string of text
These are pretty straight forward, and, of course, are all asynchronous. It’s worth noting that if we were to use one of these methods on an existing BLOB, it would just be overwritten in Azure with the incoming data – essentially a wholesale update operation.
An implementation of UploadFromByteArrayAsync is below:
private async Task<Uri> SaveToAzure(byte[] binaryData, string containerUrl)
{
    // Get the storage credentials (call out to Azure Mobile Service API)
    var creds = await GetStorageCredentials ();

    var container = new CloudBlobContainer (new Uri (containerUrl), creds);

    var blockBlob = container.GetBlockBlobReference (Guid.NewGuid ().ToString ());

    await blockBlob.UploadFromByteArrayAsync (binaryData, 0, binaryData.Length);

    // Return the URI for usage elsewhere in app
    return blockBlob.Uri;
}
Updating and Handling Large Amounts of Data
Getting data up to Azure seems pretty easy, at least when we’re inserting or overwriting whatever is there – but what about when we want to update something? That’s where the PutBlockAsync method comes in.
This allows us to add on to the end of an existing BLOB by sending up “chunks” of data that make up the entire BLOB independently of each other.
On the face of it, this method seems kind of useless … it doesn’t seem to make much sense to update parts of an existing binary file. But there is a scenario where this will come in tremendously useful … and that’s when we have such a large file that we can’t count on it being uploaded all at once (you know … because mobile devices have a tendency to go offline). This is where PutBlockAsync really shines. Using this will allow us to upload a large file in bits and pieces until it’s all up in Azure. Robin Shanan has a great article on the intricacies and some strategies that can be employed to do this.
Downloading BLOBs
The BLOBs are up in Azure … now let’s pull them back down!
If the security on the container is setup to allow anonymous read access – we do not need anything other than the individual BLOB’s URL in order to get access to it. That means we don’t necessarily need to use the download methods the Azure-Storage package gives us … but if there is security setup we can use the following:
DownloadToByteArrayAsync– Gets the BLOB as a byte array.DownloadToStreamAsync– Gets the BLOB as a stream.
And of course we can use those methods as well if there isn’t security setup on the container either – as the following demonstrates for both the byte and stream download:
public async Task<Stream> LoadBlobAsync (Uri location)
{
    // The container is setup for public read access
    // do not need to generate credentials
    //
    // If there was security, we'd have to pass the StorageCredentials to the ctor
    var cloudBlob = new CloudBlockBlob(location);

    MemoryStream imageStream = new MemoryStream ();

    await cloudBlob.DownloadToStreamAsync (imageStream);

    return imageStream;
}

public async Task<byte[]> LoadBlobBytesAsync(Uri containerLocation, string blobName)
{
    // Assumes public read access on container for BLOBs
    // If there was security, we'd have to pass the StorageCredentials to the ctor
    var container = new CloudBlobContainer (containerLocation);

    var blob = container.GetBlockBlobReference (blobName);

    await blob.FetchAttributesAsync ();

    byte[] target = new byte[blob.Properties.Length];

    await blob.DownloadToByteArrayAsync (target, 0);

    return target;
}
Notice that the first method is accessing the BLOB directly, while the second method is going through the container. Either way works, and if there was security, either way would work as well, just as long as we passed the properly setup StorageCredentials in as well.
Miscellaneous Operations
There are a couple of other operations we can perform on the BLOB objects which may come in handy that we’ll briefly touch on below:
ExistsAsync– Used to check if the BLOB exists or not.FetchAttributesAsync– Populates properties of the BLOB itself – such as the length (usage above).CreateSnapshotAsync– Snapshots are along the lines of version control. Creating one will create a copy of the BLOB and then allow you to make changes on top of it – with the ability to recall previous versions.DeleteAsyncandDeleteIfExistsAsync– Deleting!AcquireLeaseAsync,BreakLeaseAsync,ChangeLeaseAsync,ReleaseLeaseAsync,RenewLeaseAsync– Leasing applies a lock to the BLOB so others cannot modify it. This could come in very useful while uploading in parts.
Design Considerations
We made it this far, and by now you should have a solid understanding of how Azure organizes BLOBs and how to access them from our app. But let’s now talk about some design considerations that are special for the mobile developer.
- Only push to the cloud when appropriate & keep track of success. This one seems obvious on the face of it, but it is worth considering. Most of the time the BLOBs in Azure will be tied to other relational data somehow, and that data may or may not exist in the cloud. So designing a strategy to keep those in sync needs to be in consideration from the beginning.
- Push large BLOBs in chunks. Along with the first point, it may make sense to break the uploading of especially large BLOBs into parts, and have a pre-existing plan in place to handle the inevitable situation where the user wanders off the network before the whole BLOB is uploaded.
- Store the BLOB locally. This aligns with the first 2 points as well. We can’t be sure when we’ll be able to upload the BLOB to Azure – so we need to be able to give our users access to it immediately on their device should they need it. But we also need be ready to upload it as soon as we can – so make sure there’s a strategy in place to store the BLOB locally.
- BLOB / SAS Security It may make sense to make the BLOBs publicly accessible – thus bypassing the need to generate a SAS key (and the infrastructure that goes along with it) just to read them. Of course this means the data isn’t sensitive in any manner! But don’t forget we can lay BLOBs out in containers that are publicly readable, and some that are not – so thought should be given to that as well.
Summing It Up
This has been quite the ride … BLOBs and BLOBs of data thrown at you (ha)! First we looked at what exactly Azure Storage offers us, including Table and Queue Storage, then we turned our attention to an in-depth exploration of BLOB storage. We looked at how Azure organizes BLOB storage, using an account to host many BLOB containers which in turn can host many BLOBs. We also looked at the different types of BLOBs in Azure – with the Block BLOB being the type we’ll want to use the most often by far.
Finally we looked at how to use the Azure-Storage package – including how to generate a Shared Access Signature so we can get access to secured BLOBs. A review of the API of the package itself followed, and then some special considerations for the mobile developer looking to make use of large data objects in Azure.
A sample project exists exploring these concepts is in GitHub … and of course it’s all about cheese!
Comments