So how did you spend your summer vacation?
One thing is for sure, I did not spend my month of August blogging! I presented two sessions at That Conference in mid-August and then in late August gave another session at Xamarin Dev Days – Madison. Not exactly resting on the shores of beautiful Lake Mendota here in Madison … but a lot of fun nonetheless.
Anyway – I’m back with a Back To School Blog! This time we’re going to take a look at how to create a custom binding to a ContentView within Xamarin Forms.
What’s A Custom Bindable Property?
Have you ever found yourself wanting to create a control or a view that inherited from ContentView and you needed to implement data binding on a property that that control/view exposed – so you could tie the property to a view model?
The good news is we can do this … We can fully customize the way it binds to the view model – one way, two way, one way to source. The even better news – it’s pretty easy once you see it the first time!
So let’s take a look at the steps necessary to create a bindable property.
Creating A Bindable Property
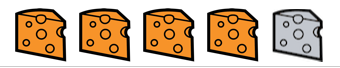
In this example, the ContentView we’re going to add a bindable property to is a control which allows you rate cheeses. (Wow – I talk about cheese a lot!) It displays 5 cheese wedges, and by tapping on a wedge, it updates the view model behind it. Also on initial display, the number of wedges highlighted corresponds to the “rating” in the view model. The control looks like this:
So, here are the steps to add a “WedgeRating” property and make it bindable within this CheeseRatingView control ….
- Create a regular property in the class.
public int WedgeRating { get; set; }
- Create a static read only field of a
BindablePropertytype. Name it the same as the property name from step 1, but with the word “Property” at the end.
public static readonly BindableProperty WedgeRatingProperty
// there will be more here
- Create the bindable property using
BindableProperty.Create<T, V>.
First off … what are theTand theVparameters? TheTwill be the type of the view the property is a part of. So, in our case it’s aCheeseRatingView.
The V is the property’s type we’re going to bind to. So, in this case, an int.
Then the Create function takes several parameters, many of which can be null (all of the delegates). So let’s break them down one by one so we can see what we’re setting … and why.
| Field Name | Signature | Description |
|---|---|---|
| getter: | Expression | An expression that should be used for the "getter". To continue our example from above the expression will be along the lines of rv => rv.WedgeRating; |
| defaultValue: | V | Plain and simply a value to use when none has been supplied. Of course it will be the type of the property. |
| defaultBindingMode: | BindingMode | An enumeration to specify what type of binding mode our property should have. |
| validateValue: | ValidateValueDelegate | When specified inline the delegate will accept 2 parameters, the bindable (or the current class) and the value the property is being changed to. The delegate needs to return a boolean as to whether the new value passes validation or not. If it does not pass validation then an ArgumentException is thrown in the backing property. |
| propertyChanged: | BindingPropertyChangedDelegate | Fired AFTER the property has changed. Here is a good place to update the UI (i.e. change the number of wedges). When specified inline this will receive 3 parameters: bindable (the current class) the old value of the property and the new value of the property. |
| propertyChanging: | BindingPropertyChangingDelegate | Fired BEFORE the property has changed. When specified inline this will receive 3 parameters: bindable (the current class) the old value of the property and the new value of the property. |
| coerceValue: | CoerceValueDelegate | Here is a place where we can change the value of the property before it gets set. Why? Who knows maybe we're rating a cheese that should always be a 5 no matter what the user says! When specified inline this delegate will receive the current class as the bindable and the value the property is being changed to. It needs to return the value it should change the value to. |
| defaultValueCreator: | CreateDefaultValueDelegate | A delegate that will get fired for the default value setting. When specified inline it just receives a current instance of the class. It needs to return the value to set the property to. |
The order in which the delegates get called are as follows:
| Order In Which Invoked | Delegate |
|---|---|
| 1 | ValidateValueDelegate |
| 2 | CoerceValueDelegate |
| 3 | CreateDefaultValueDelegate |
| 4 | BindingPropertyChangingDelegate |
| 5 | BindingPropertyChangedDelegate |
So … when all put together – an implementation might look like this (except with a lot more functionality instead of just comments and return values!):
public static readonly BindableProperty WedgeRatingProperty =
    BindableProperty.Create<CheeseRatingView, int> (
        rv => rv.WedgeRating,
        1,
        BindingMode.TwoWay,
        (bindable, value) => {
            // Here we would validate the new value against
            // whatever criteria we choose.
            // Note: "bindable" in this case is an object with a "RatingView" type.
            return true;
        },
        (bindable, oldValue, newValue) => {
            // Property has changed

            // We can call something here to update the UI
            var thisView = (CheeseRatingView)bindable;

            // Update the UI to display
            // the correct number of highlighted
            // cheeses
            thisView.UpdateRatings();

        },
        (bindable, oldValue, newValue) => {
            // Property is changing
        },
        (bindable, value) => {
            // Coerce the property
            // Here we would override what the passed in value is
            // And return something else - if we wanted to
            return value;
        }, (bindable) => {
            // This is the default creator
            return 1;
    });
- Flush out the backing property from step 1 to make use of the new bindable property.
public int WedgeRating {
    get {
        return (int)GetValue (WedgeRatingProperty);
    }
    set {
        try {
            SetValue (WedgeRatingProperty, value);
        } catch (ArgumentException ex) {
            // We need to do something here to let the user know
            // the value passed in failed databinding validation
        }
    }
}
- Use the control – setting the binding as one normally would. (Here we’re doing it in code, you could easily do it from XAML as well).
var ratingView = new CheeseRatingView (true);
ratingView.SetBinding (CheeseRatingView.WedgeRatingProperty, "CheeseToAdd.WedgeRating");
Here the instance of the view model is called “CheeseToAdd” and the property we’re binding to is called “WedgeRating”.
That’s It!
That’s all there is to it. The key thing to remember is the BindableProperty and then creating it appropriately.
School is back in session!
Science Hall Photo: Dori
Comments