It goes without saying that I’m a big fan of Xamarin.Forms. It’s the first framework I evaluate when taking on a new project. I love all of the out of the box goodness it provides – easy MVVM (especially the binding), layout engine, and now it’s very easy to get down to the platform – without necessarily having to resort to renderers.
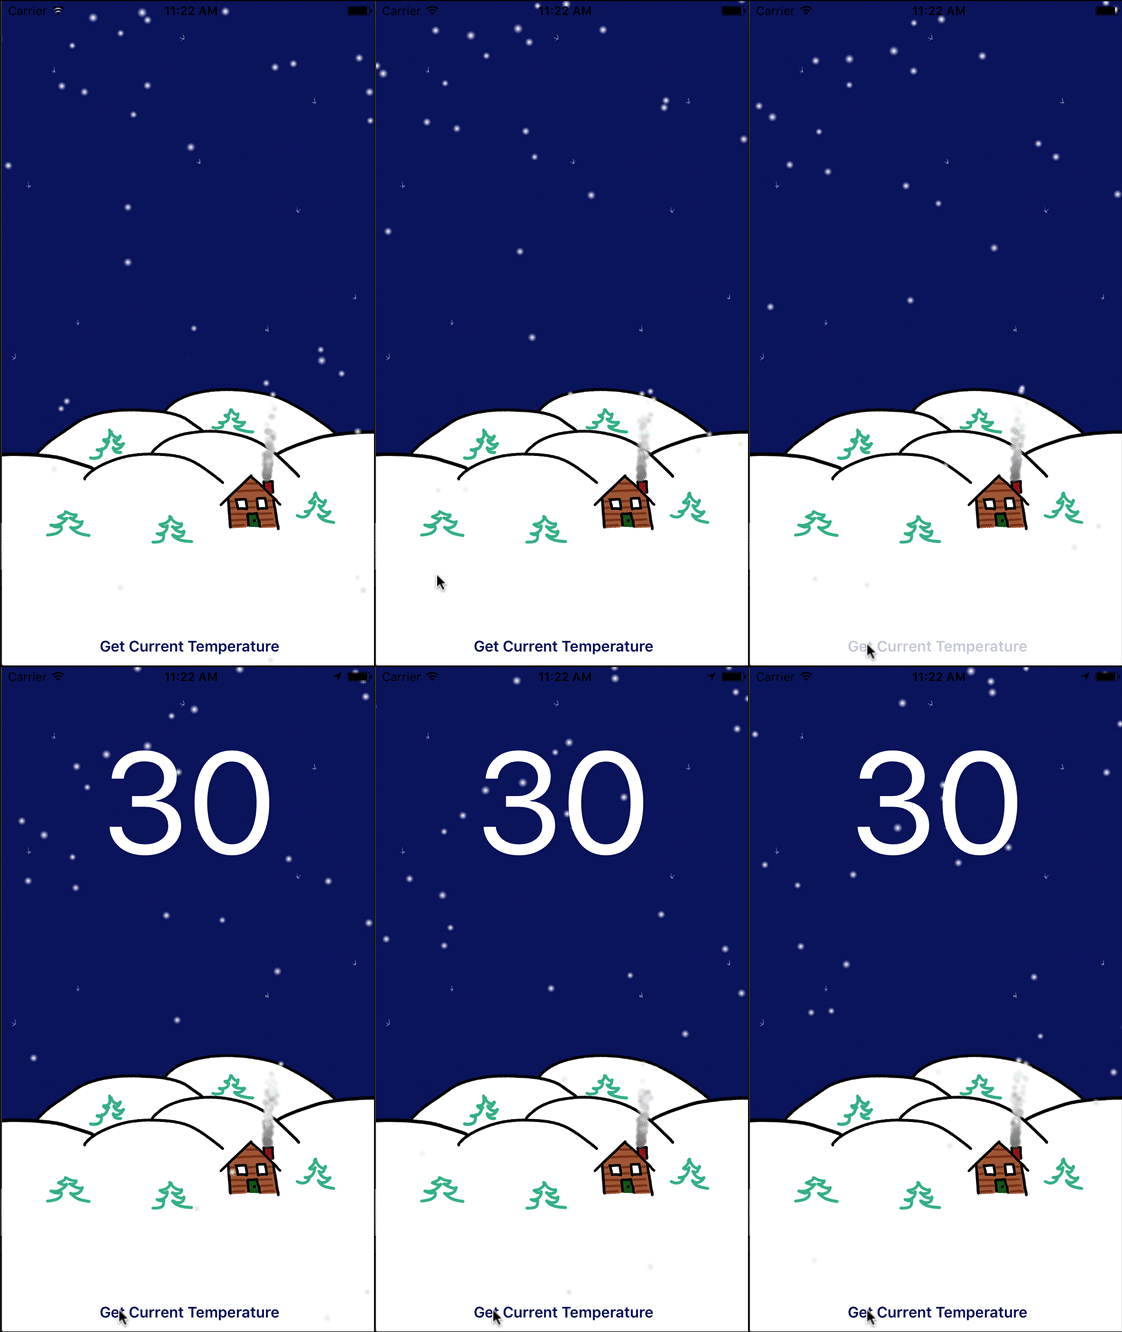
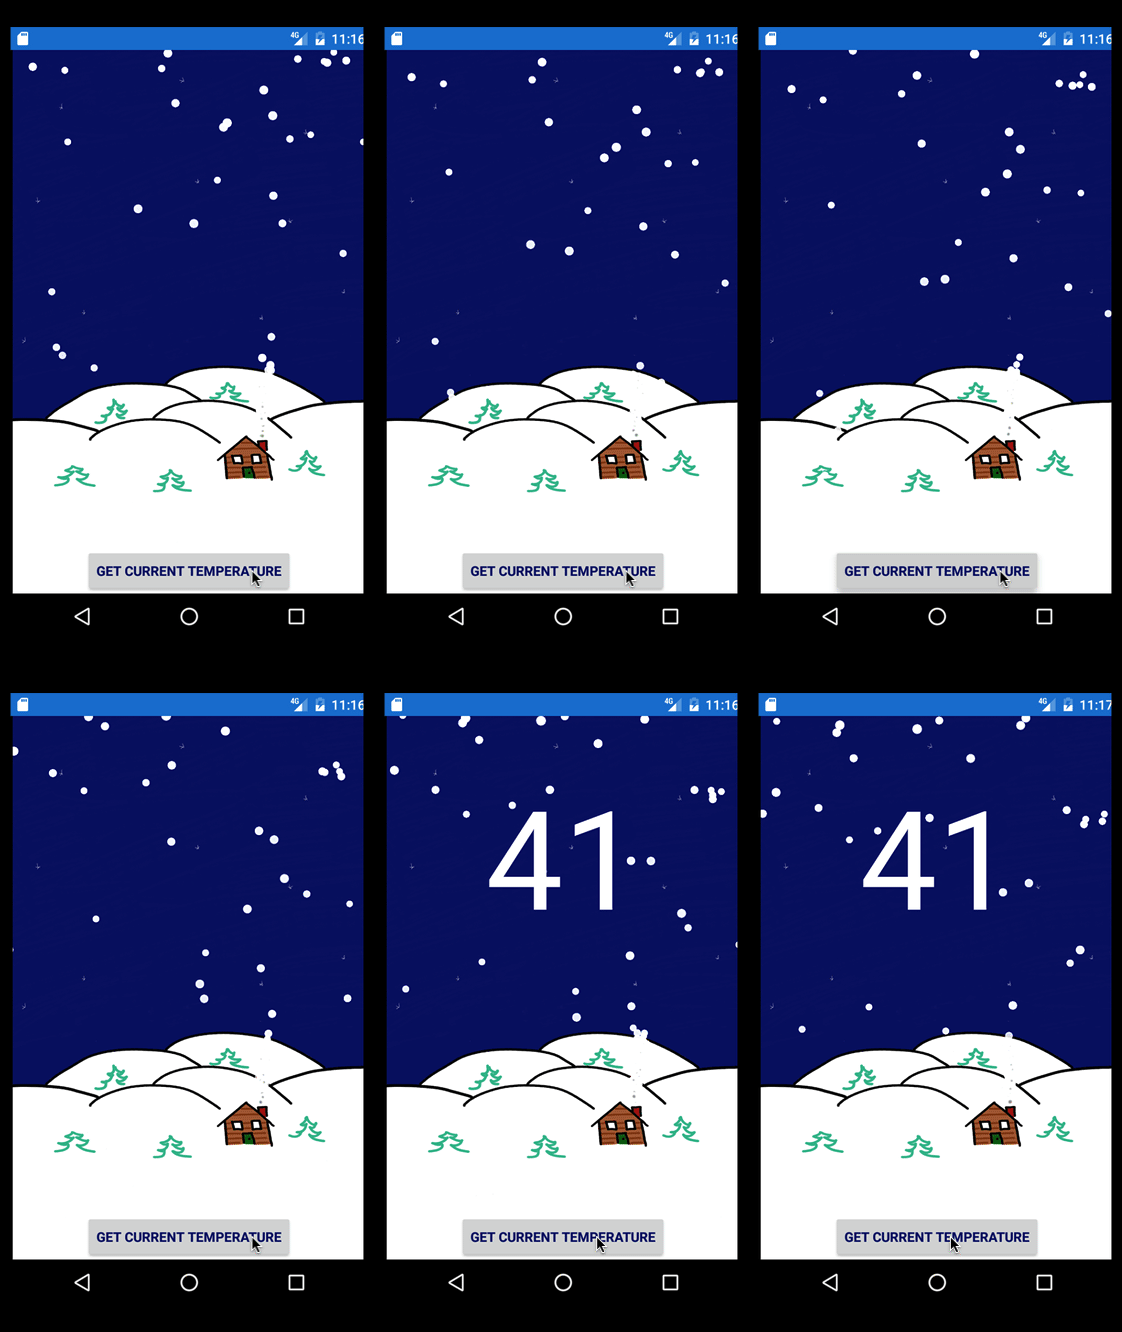
But … I also like the look of full screen apps that are, how should I say … a little more pizazz-y. You know the ones – they’re full screen, lots of cool graphics, maybe some “things” animating about the screen. Something that looks a bit like the apps below.
|  |  |
Those apps are cool … but surely one couldn’t do that with Xamarin.Forms … right? Right?
Wrong!
Those apps are both done with Forms – and both are running pretty much with the normal Forms elements – Button, Grid, some data binding. But to give it a bit of pizazz – there’s some CocosSharp running in it as well. And it’s pretty easy to get setup and running.
So let’s take a look at how to do so! Full source can be found on GitHub here.
Hello CocosSharp
The key to getting that cool background and those animations is CocosSharp. My inspiration for all of this was the weather app Carrot. If it’s snowing, it shows some snow falling – if it’s raining, it shows some rain… etc. I wanted to see if I could reproduce that with Xamarin.Forms.
CocosSharp is a game development framework. It’s fully featured (I’m talking physics engine and everything). If you desire, you could write an entire game in Forms within it. We’re not going to be using all of CocosSharp … all we need are some particles and some sprites.
First thing first – gotta add CocosSharp to the projects. It’s a NuGet – and conveniently called CocosSharp.Forms. Add it to the platform projects. If you’re using a PCL it’s worth noting that you have to change the PCL profile to 111 before adding the NuGet. Notably, that will remove the ability to develop for UWP (along with other lesser Windows platforms).
Next up is to get to know the main components that we’ll be using.
CCSprite
CCSprite is the class that takes care of image rendering in CocosSharp, and it’s how I’m displaying the background and house in the app. There are a couple of interesting things you need to do in order to setup the images to be available for CocosSharp to display.
The first is to create a Content folder in each of the platform projects. Under that, create an Images folder, while not necessary, it’s good for organization (make sure to read the Layers, Scenes and Views section below for more on this). Pop your images in there.
In the iOS project, make sure you set the Build Action to BundleResource . Whereas on Android, the Build Action should be AndroidAsset. Now the images are available to the framework.
Next up is to actually create the CCSprite object. The way I did it was to use the constructor that accepted a string for a file name. The file name you pass in only needs to be the name of the image added to the folder – without the extension.
Other useful properties of CCSprite are Position, which is exactly what it sounds like … where the sprite is within the overall scene. The Position is specified by another class in CocosSharp called CCPoint – which is an X/Y coordinate.
One very interesting thing about CocosSharp is that the 0,0 position is in the lower left and then X increases to the right and Y increases to the top. Which is not how some other frameworks work. (In my opinion, this is more intuitive.)
AnchorPoint, this specifies where on the sprite the Position takes hold. For example, if you specify the AnchorPoint to the middle of the sprint and the Position to x=0 and y=0 – half of the sprite will not be visible, as the absolute center will be at 0,0. There are several constants on CCPoint which specify various common anchor points (middle, top left, etc).
Then ScaleX and ScaleY … you’ll want to pay attention to these as you’ll need to be sure that the image is not too large (or too small) to fit on the screen.
But how does one know what to set the scale to? Good question. Overall you need to know the dimensions of the area where you’re putting everything. And from there you can scale it based on that overall area vs. the image dimensions. This post describes a nice way of getting the overall screen dimensions into the Forms app (and it deals with CocosSharp in Forms as well).
With all that said – here’s the code to create the 2 images in the app (note that App.Width and App.Height are set from the platform project and are the width & height of the full screen):
CCSprite backSprite;
backSprite = new CCSprite("sky");
backSprite.AnchorPoint = new CCPoint(0, 0);
backSprite.ScaleX = App.Width / backSprite.TextureRectInPixels.MaxX;
backSprite.ScaleY = App.Height / backSprite.TextureRectInPixels.MaxY;

CCSprite houseSprite;
houseSprite = new CCSprite("house");
houseSprite.AnchorPoint = CCPoint.AnchorMiddle;
houseSprite.Position = new CCPoint((App.Width / 3) * 2, App.Height / 4);
houseSprite.ScaleX = backSprite.ScaleX;
houseSprite.ScaleY = backSprite.ScaleY;
Particles!
The falling snow and smoke coming out the chimney were accomplished via particles. CocosSharp comes with several built-in particle effects that you can create and add. Here, I’m using CCParticleSnow and CCParticleSmoke (as if you wouldn’t have guessed that).
Particles have a ton of properties that you can set on them to change the way they appear. And most are self-explanatory – StartColor, EndColor, StartSize, EndSize, etc. If you see a property that ends in “Var” it sets the variance in the corresponding property … introduces a bit of randomness. So StartSizeVar on the snow particles would make sure the starting size of the snow flakes are not the same all the time.
The best way to get the particles to look like what you want is to experiment with the various properties. And Xamarin Workbooks are perfect for this. You get to avoid the whole start and restart scenario in the simulator/emulator.
The code to create the snow particles in my app is as follows:
ParticleSnow snow;
snow = new CCParticleSnow(new CCPoint(App.Width, 20));
snow.Position = new CCPoint(App.Width / 2, App.Height + 1);
snow.StartColor = new CCColor4F(CCColor4B.White);
snow.EndColor = new CCColor4F(CCColor4B.LightGray);
snow.StartSize = 10f;
snow.StartSizeVar = 2f;
snow.EndSize = 8f;
snow.EndSizeVar = 1f;
snow.Speed = 2f;
snow.Gravity = new CCPoint(0.5f, -2);
snow.EmissionRate = 2.5f;
snow.Life = 50f;
(And check out the solution on GitHub to see the smoke particles.)
Layers and Scenes and Views
To actually make things show up on the screen – you need to add them to a CCLayer object. In this case a CCLayer is exactly what it seems like – a layer within an overall scene. Add the particle, sprites or other visual elements to that layer and then add that layer to a scene – and everything will show up.
But what’s a scene? The CCScene class is pretty much the base layer of where everything else will be added to. At least that’s how I think of it. Scenes hold layers. Layers hold visible objects. Only 1 scene can be active at any given time.
Finally – there’s the CCGameView. This is the OS window upon the whole CocosSharp world. So it’s here that you set some “world” properties that will apply to everything.
The most important being DesignResolution. This is a property that takes a CCSizeI object which specifies the width and height of the internal coordinate system. Note that it does not specify how large the view will be outside. In other words – specifying 100 by 100 means the maximum X coordinate in the CocosSharp world would be 100 – regardless of how many operating system pixels the actual view takes up.
Another important property is to set the ContentManager.SearchPaths . This is a list of strings which tells CocosSharp folders which to search for content. So if you put your images under an Images folder from before – make sure to have an Images entry in this list! (Note that whatever you put in here will search under a Content parent folder.)
Then finally, you need to tell the game view which scene to start running initially. This is done via the RunWithScene function.
But where does the CCGameView come from?
Making It Work With Xamarin.Forms
Everything I’ve talked about up until this point has been CocosSharp only – nothing specific to Xamarin.Forms. Luckily the Forms part is super, duper simple. There’s a class in the CocosSharp.Forms NuGet called CocosSharpView . That class inherits from the Xamarin.Forms View . That means it can be added to any visual layout in Forms like anything else … a Label , a Button … to Forms it’s all the same.
The one caveat is that the CocosSharpView class takes a bit of time to initialize, so you need to register an event handler, ViewCreated, to handle when it’s ready. Within that event handler is where you’ll start setting up the scene and layers, etc. And wouldn’t you know it … this event handler also gets sent the CCGameView object as the sender object in the function args. So it’s within here that you kick off the RunWithScene function!
Then because that CocosSharpView is a normal Xamarin.Forms View – you can add it to a layout of some sort (Grid, Stack etc), put it within another ContentView , do whatever you wish to it! I subclassed a ContentView – then have the CocosSharpView be the only thing within that ContentView – taking up its entirety. Then added that to the XAML as follows:
<?xml version="1.0" encoding="utf-8"?>
<ContentPage
        xmlns="http://xamarin.com/schemas/2014/forms"
        xmlns:x="http://schemas.microsoft.com/winfx/2009/xaml"
        xmlns:local="clr-namespace:Particle"
        x:Class="Particle.ParticlePage">
    <ContentPage.BindingContext>
        <local:WeatherViewModel />
    </ContentPage.BindingContext>
    <Grid>
        <Grid.RowDefinitions>
            <RowDefinition Height="*" />
            <RowDefinition Height="Auto" />
        </Grid.RowDefinitions>
        <local:SnowyBackgroundView
            HorizontalOptions="FillAndExpand" VerticalOptions="FillAndExpand" Grid.RowSpan="2" />
        <Label Text="{Binding Temp}" FontSize="144"
            Grid.Row="0" HorizontalOptions="Center" TextColor="White" Margin="0,50,0,0" />
        <Button Text="Get Current Temperature" Command="{Binding GetWeatherCommand}"
            Grid.Row="1" HorizontalOptions="Center" TextColor="#050E68" FontAttributes="Bold" />
    </Grid>
</ContentPage>
Summary
You can do some pretty slick stuff with Xamarin.Forms and CocosSharp. The best thing is that CocosSharp is not only restricted for game development – you can use it for pure “decoration” as I have done here. It will also render the same “look” on all platforms, so if you would want to create any “fancy” UI elements such as buttons – you could easily do so from within. CocosSharp also gives you an easy means to get at custom fonts as well … it’s well suited to swank up your next Forms app!
Comments