Adding custom fonts into a Xamarin.Forms project might be something know how to do already.
And that's because Xamarin has an entire documentation page written on how to do it!
But ... as is often the case ... I ran into issues when trying to add custom fonts into a Xamarin.Forms app, so I figured I would write up an article on how to add custom fonts into a Xamarin.Forms project - AND - also document the issues I ran into.
As is often then case ... I ran into issues ...
Xamarin.Forms is a framework to help us write cross-platform apps - it does not actually generate the apps. That is still left to the platform - the iOS or Android (or UWP, if you're into that) projects.
And it's into those projects that we must add the custom fonts - then later reference those fonts from the Xamarin.Forms project.
So let's start with looking at adding fonts into the platform projects.
A fully working demo project can be found on GitHub.
iOS Custom Fonts
This section could easily be subtitled - the only time when doing something in Android is easier!
Adding Fonts
Adding the font is pretty straight forward ... referencing the font is where I got tripped up. Let's look at adding it first.
- Take the font file and add it to the Resources folder in the iOS project.

- Open up the properties panel for the font and make sure the Build Action of the font is set to Bundle Resource
- Also verify the Copy to output directory is set to Always

- Add a new key to the Info.plist file. The name of the key is UIAppFonts the friendly name is Fonts Provided by Application and it will be of the type array. Then add the file name of the font. So in this case it would be CabinSketch-Reg.ttf.
Many thanks to Sylvain Gravel, who in the comments pointed out that originally, I forgot to add in the last step above ... adding the font's file name to the Info.plist file
Referencing Fonts
Referencing the font should be straight forward ... well, you would think so.
The font is going to be referenced the via the FontFamily property of whatever control whose font you are changing.
In our example, that control will be a Label.
Then, because the font is referenced differently from each platform - we need to use the OnPlatform keyword in order to get at it from the various platforms.
So far, so good ... that means then to reference the font - which by looking above is named CabinSketch-Reg, I need to do something like this:
<Label TextColor="#934293" Text="Swanky" FontSize="80">
	<Label.FontFamily>
		<OnPlatform x:TypeArguments="x:String">
			<On Platform="iOS">CabinSketch-Reg</On>
		</OnPlatform>
	</Label.FontFamily>
</Label>
What I ended up with was this:

And that, most definitely, does not look swanky ... and it's not the correct font either!.
So what was I doing wrong?
From the Xamarin documentation:
Refer to it by name wherever you define a font in Xamarin.Forms!
Easy enough - looking back up at the screenshot where I added the font, it's name is CabinSketch-Reg... right? And that's what I was doing!
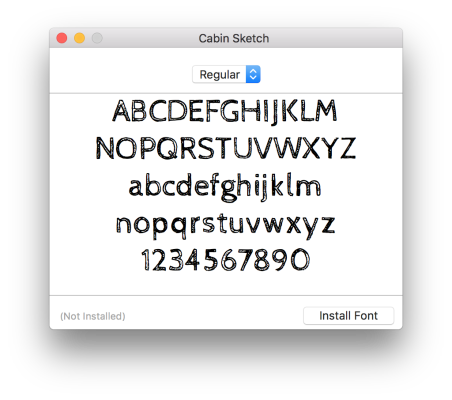
So, after banging my head against the wall for a while, I decided to open the font up in Font Book on the Mac. And the screen looked like this:

A-ha! That's when it hit me ... the font's name wasn't it's file name ... rather it was it's given name ... so in this case Cabin Sketch - as displayed across the title bar.
So I changed the Label definition to be:
<Label TextColor="#934293" Text="Swanky" FontSize="80">
	<Label.FontFamily>
		<OnPlatform x:TypeArguments="x:String">
			<On Platform="iOS">Cabin Sketch</On>
		</OnPlatform>
	</Label.FontFamily>
</Label>
And then it looked like this:

Much, much swankier!
So the key to the whole thing? Always refer to the font by its given name - never its file name ... just like the documentation says ... but sometimes the documentation isn't clear - even when it says exactly what it means!
Android Custom Fonts
Adding the fonts on Android is much, much easier. (Which is something I never thought I would type when talking about Android.)
Adding Fonts
To add the font - you only need to add the font file to the Assets folder.
Then make sure the Build Action is set to Android Asset.
Referencing Fonts
Android fonts are referenced in the following format:
{font file name}#{font name}
So, knowing what I now know from struggling with iOS (that font file name != font name) ... adding the reference to Android is trivial!
The font will be referenced in the same Label control as
the iOS from above.
A new <On> element will be added to the <OnPlatform>, and the entire Label definition will look like the following:
<Label TextColor="#934293" Text="Swanky" FontSize="80">
	<Label.FontFamily>
		<OnPlatform x:TypeArguments="x:String">
			<On Platform="iOS">Cabin Sketch</On>
			<On Platform="Android">CabinSketch-Reg.ttf#Cabin Sketch</On>
		</OnPlatform>
	</Label.FontFamily>
</Label>
The font then looks like this on screen:

The swank knows no bounds!!
Summary
This can all be summed up as ...
Use the font's NAME in iOS not its file name.
But in addition to that ... when adding fonts in Xamarin.Forms, remember that the fonts themselves need to be added to the platform projects.
In iOS - make sure the font is set as Bundle Resource and Always Copy to output directory.
In Android - add it to the Assets directory and verify its set as an Android Asset.
And again...
Use the font's NAME in iOS not its file name.
And you'll be off using swanky fonts in your apps!
Download the fully working demo project from GitHub.
Comments