So you want to authenticate your ASP.NET Core web app with Azure AD. It sounds daunting, but with a little help from the Microsoft.Identity.Web SDK and knowing how it fits in with the pieces of Azure AD's Applications, it's not too bad.
Confused by all the terminology and how they fit together? Head on over to this article to clear that up.
Authentication Made (Kind of) Simple
The intention of this article is straightforward. Configure Azure AD to allow users of your application to sign-in. And create an ASP.NET Core web application that signs in.
If you read the previous article, you'll see how the concepts introduced fit in with this this sign-in or authentication portion.
And if you're already good on Azure AD authentication with ASP.NET Core, you'll learn about a new middleware and makes authentication even easier - Microsoft.Identity.Web.
Configuring Azure AD
In order to authenticate against Azure AD, you're going to need an Azure AD application. (And you're going to need an Azure subscription - if you don't have one, get some free credits for one here.)
The documentation on how to do that is very good, so I won't repeat it.
But I will call out a couple of important concepts you should understand (and some things you'll want to change).
Application and Directory IDs
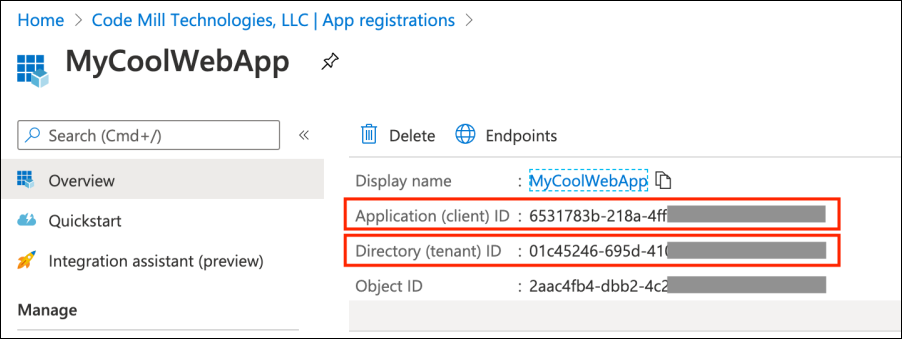
The first is the concepts of Application ID and Directory ID.
Almost like everything else in Azure AD, these go by multiple names.

You can see the info in the screen shot above from the the application detail overview screen via the App Registrations blade in the Azure Portal
You will hear Application ID referred to as Client ID and Directory ID referred to as Tenant ID.
These terms are interchangeable and mean the same thing. Application ID is the Client ID. Directory ID is the Tenant ID.
The Application ID uniquely identities the Application within Azure AD. You can name the application whatever you want (and change it), but the ID is a system generated GUID. But know that it only refers to the application.
The Directory ID on the other hand refers to the entire Azure AD instance. Azure AD can contain many applications. But the Directory ID never changes.
Redirect URIs
The second concept is Redirect URIs.
During the sign-in/authentication process, your application is giving control over to Azure AD. The user interface will look completely different (you can customize it though).
So how does Azure AD know where to send the Identity and Access tokens when it gives control back to your application?
The Redirect URIs.
And you can specify many of them. And you can even specify a special one for when a user logs out.
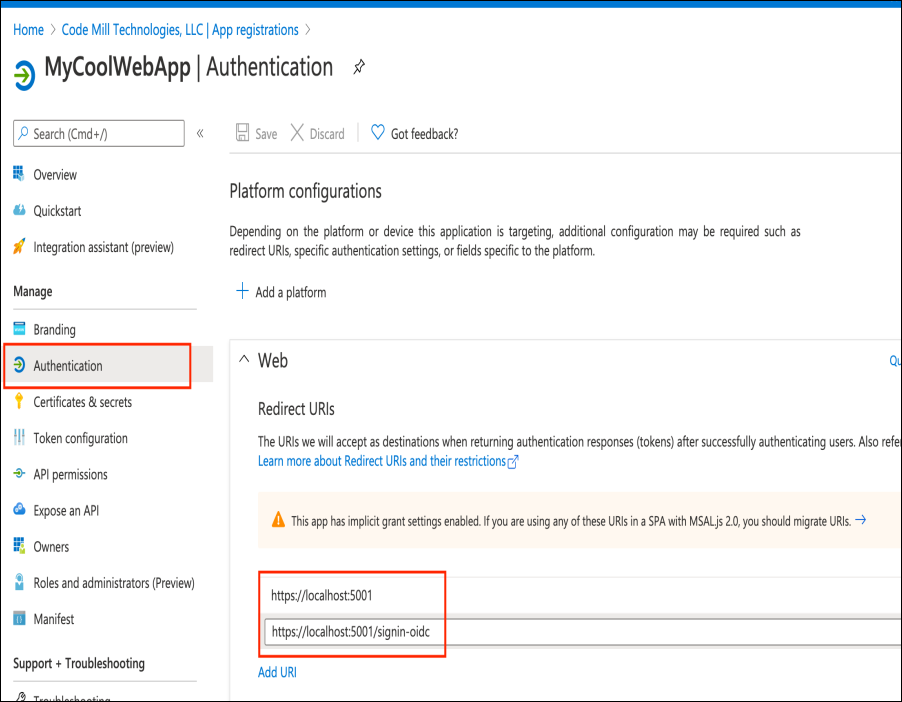
What I want you to do now is change the Redirect URIs from before.
Make one https://localhost:5001 and the other https://localhost:5001/signin-oidc.

You can configure the Redirect URIs from the Authentication blade of your Azure AD Application
And change the Logout URL to be https://localhost:5001/signout-callback-oidc while you're there as well.
The Logout URL serves the same purpose as the Redirect URIs, except for when your app is logging the user out.
The Web Application
That's it for configuring and understanding the Azure AD portion of authentication with an ASP.NET Core web application.
Now you'll integrate that into the web app.
Microsoft.Identity.Web
So before we get into creating the web application itself, I want to introduce you to a new library called Microsoft.Identity.Web.
This thing is awesome! It's specifically made to make life easy when creating ASP.NET Core web applications and web APIs to integrate with Azure AD V2 endpoints (and also Azure AD B2C).
And it uses MSAL under-the-hood. So it's built on top of a fully featured framework.
There are NuGet packages for .NET Core 3.1 and .NET 5, it provides user interface helpers, and maybe best of all, it comes with templates for dotnet new so it installs all the scaffolding for you.
Installing Microsoft.Identity.Web Templates
Right now Microsoft.Identity.Web is still in preview. But it's going to be GA... soon. So in the meantime you can install the dotnet new templates yourself by cloning https://github.com/AzureAD/microsoft-identity-web and then following the directions here.
Authentication!
Now let's put all the pieces together by building a Razor app from the new templates.
I'll show some important differences the Microsoft.Identity.Web gives you from the old way of implementing authentication in ASP.NET Core apps.
Create a new directory and run this command: dotnet new webapp2 -n TodoListApp -au SingleOrg.
All we need to do is configure the appsettings.json and we'll be good to go.
Modifying appsettings.json
So the appsettings.json file gets templated like the following:
Alright, there should be a couple of terms in there you recognize and you already know where to get them from.
- TenantId: That's the Directory ID talked about above. Copy it from the Azure AD Application's overview screen and paste it in here.
- ClientID: That's the Application ID talked about above. Same thing - copy from the Azure AD Application's overview screen and paste it in here.
- CallbackPath: This is the path portion of the RedirectURI. You can leave it as is.
Now add in another value called SignedOutCallbackPath and set its value to /signout-callback-oidc. This is the path portion of the Logout URL you set.
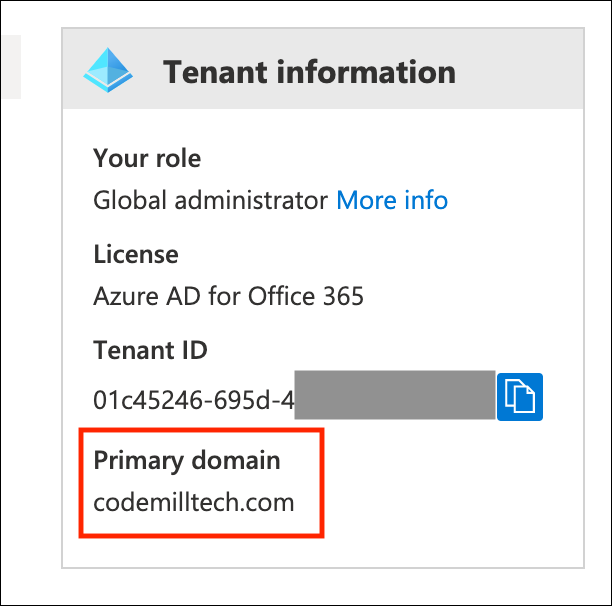
Finally you'll need to set the Domain up.
To get that value - either ask your Azure AD admin what the primary domain is - or check out the overview screen of the entire tenant.
There will be a little box that says Tenant Information and that will have the primary domain name in it.

Run the code locally - you should be able to authenticate!
Explaining the Rest of the Code
Now let's take a look at some of the code that made the authentication so easy.
Let's start in Startup.cs.
Checkout the ConfigureServices function. The very first line there: services.AddMicrosoftWebAppAuthentication(Configuration, "AzureAd"); is setting up the Microsoft.Identity.Web middleware.
Also note it's using the "AzureAd" value for the second parameter. That's specifying which section holds all the configuration information in the appsettings.json file.
With the old, non-Microsoft.Identity.Web templates, that line would have been services.AddAuthentication. No longer.
Then further down during the AddRazorPages() series of lines. The very last one is AddMicrosoftIdentityUI().
This is popping in some controllers from Microsoft.Identity.Web.UI that handle calling out to Azure AD and also handle the callbacks.
So the signin-oidc path of the Redirect URI? That's a controller that resides within Microsoft.Identity.Web.
Now finally, open up LoginPartial.cshtml.
The 2 links that do the sign-in and sign-out have an asp-area="MicrosoftIdentity". Indicating that the link should direct to functionality contained within Microsoft.Web.Identity.
We're Done!
So that's it.
To use Microsoft.Identity.Web to authenticate an ASP.NET Core web application to Azure AD:
- Create the Azure AD Application
- Install the
Microsoft.Identity.Webtemplates - Create your ASP.NET Core with those templates
- Configure the
appsettings.json
But even though it's as easy as 4 steps - it pays to understand the underlying concepts of how everything fits together.
Comments